|
Recently in class we've been working with modular design, which is modeling each part of a whole, of which is repeated within that whole, as individual pieces that are later put together. For example, walls, windows, and staircases are often repeated within the design of buildings, so when modeling buildings it would be helpful to model each once and reuse the same model whenever they need to be placed in another area. The same can be said for game development, if an asset is used in various places throughout a game, it can save a lot of time to model it or pieces of it then assemble it when needed. Having individual parts modeled allows for unique combinations to generate separate structures without having to actually model an entirely new structure. Prior to working with modular design I've always wondered how open world RPGs created all of the buildings and cities to be seen without spending an absurd amount of time on them, because after all there are usually hundreds in these games. Now however, when I play these games I can see the use of modular design in order to create buildings and reuse pieces in a different order all around the city, to make it appear as though the player is surrounded by numerous unique buildings, when in reality it is the same pieces arranged differently. I greatly appreciate the amount of time that can be saved with the use of modular design, and now I'm not so worried about modeling the assets my team needs for our game, as I'll likely be able to use this new knowledge to save dozens of hours of modeling. I look forward to working with modular design more in the future, especially when it comes to texturing, which has always been a hassle for me.
Main Points
0 Comments
Having so many days off we have been learning so much new material so quickly, but for the most part I've been able to understand all of it without any problems and finish my assignments. However, the most difficult skill to learn so far has been the curve editor. It didn't seem like it would be difficult at first, but I didn't understand much of the material. The very first assignment for the curve editor took me four of five days to complete due to poor planning. For the first two days I followed the tutorial then realized it didn't really get me anywhere, so I restarted having a better idea of what to do but not knowing how to make the ball turn around correctly. I got the wall to bounce off of the first wall easily, editing the curve to make it look smooth and natural, but the second bounce was extremely hard for some reason and took me two days to perfect. The ball lost so much energy to the point where I wasn't sure if it would make more sense for the ball to bounce or to just roll off the wall. I decided it should bounce, but the ball always moved slowly towards the wall and awkwardly to the ground afterwards. It seemed no matter what I did it would not cooperate and I was about to give up when I discovered that I could choose to only affect the start or end of a curve with an operation. I combined that with moving where on the timeline the bounce occurred and finally got the bounce I was looking for, afterwards the ball just rolled on the floor then bounced off of the sofa. Main Points
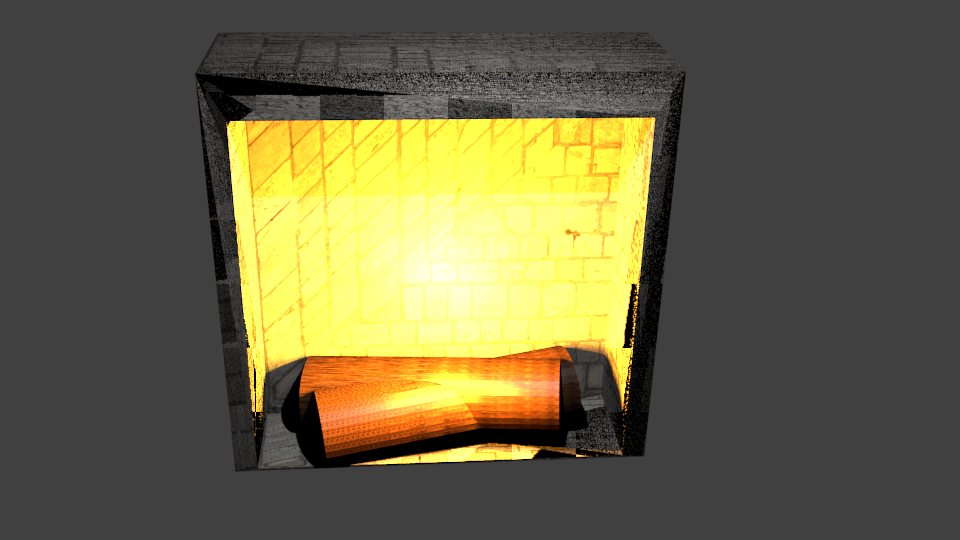
This week we learned about how to use lights in 3ds Max as well as why certain lights are used for certain scenarios. The unit was pretty simple which is probably why we were only given a week to do all of the assignments. That said though, I didn't even finish all of the assignments within that week. I spent most of my time working on the first assignment which required images showing examples of lights being used in games as well as a paragraph describing each image. All of the assignments after that have been quick 15 minute assignments though so I should be done with the rest by Tuesday or Wednesday. Of all of the types of lights omni and spotlight are my favorite because they are the simplest to work with. Omni quickly lights an area with a nice decay which makes it look good while free and target spotlights are useful in just about any scenario. I'm not a fan of directional lights because their use is much more limited and generally lights up a smaller area than what other lights are capable of. In all of the assignments I have done so far I've only used spotlights because of how useful they are. All in all though I liked the lighting unit even though it was extremely quick which got me a little bit behind and I got a bad quiz grade. I'll have to make sure to review all of the material before the next quiz, not just what I'm using for the current assignment I'm working on.
Main Points
So far I have enjoyed UVW mapping much more than working with textures and shaders because it allows for much more realistic models of real life objects. Textures and shaders were nice, but they could take a while to render, whereas I haven't had any problems with UVW mapping so far. The most difficult part about working with them is actually applying the images to each material and showing each material in the viewport. It isn't really a difficult process, but it is tedious and used a lot of my time for the box assignment. Each time I wanted to add a new image to a side I would have to add a standard material then add a bitmap for that material and show it in the viewport as I backed out to the parent material. Of course because there are six sides to a box I had to do this six times, as well as readjust the image if it was rotated incorrectly each time. I was most surprised with how realistic the final result was when rendered because it is shown as quite blurry in the viewport, but the render sharpens the images. It was also interesting to use the composite material editor instead of the slate, but it wasn't hard to adjust to. The main difference was that the material previews were displayed on top and editing was done below. So all in all I didn't find the transition to UVW mapping all that difficult, besides the huge amount of time it has taken me to complete a single assignment.
Main Points
Recently we've been learning new techniques to make more complex 3D models and scenes. Many of these new techniques make models look or act much more realistic than they really are. For example, using mental ray caused our objects to look very realistic with textures and shading we had never used before. We've also learned how to use MassFX, which creates a realistic simulation of physics. In the next few months we will probably be making much more realistic 3D models and scenes now that we know how to do so. I hope to use MassFX more often in future assignments because it was fun to work with and never caused any problems for me. We also used it to make animations rather than scenes, which allow for much more creative work to be done. Whenever we make animations I like to add small extra details wherever I can just for the fun of it. Mental ray was interesting, but it was removed in the new version of 3DS Max and took a while to render a single image, so I don't think we'd be using it in animations anyways. The cloth modifier generally did not work for me so I hope we don't use it much in the future, it always found some way to mess up a perfectly normal simulation. Working on our current project has been fun so far because it includes most of the new modeling techniques we have learned about. Hopefully they all come together to make an interesting and active simulation, but it will take some time to make them do so. It would be interesting if other assignments in the future also included several modeling techniques, just as long as they aren't as complicated as this one.
Main Points
Recently we have started to work with creating simulations in 3ds Max, and so far it has been quite a volatile experience. I've only made it to the flag so far, but I haven't finished it because sometimes my simulation will work and other times it will cause my flag to explode, with no changes to the simulation. The most difficult part of making simulations has been attempting to keep my flag wave in the wind, it either falls straight down or goes directly backwards when the simulation starts before it actually waves in the wind. I was looking forward to enjoying watching a nation's flag wave in the wind, but even when I get my flag to work I can't see the material I applied to the flag unless the render preview is open. Another part I've been struggling with is the tablecloth, it seems the table always tears the cloth no matter how smooth I make it or how many times I chamfer it. I've tried a variety of materials for the cloth going over the table and a variety of different table shapes, but nothing has worked. So far I do not enjoy working with simulations because just about everything goes wrong and does not work on the first try, unlike everything else I've done in 3ds Max. I've reviewed the tutorial given with the assignment several times and attempted to research online how not to tear a cloth when it lands on a box, but only tutorials for how to tear something pop up. Hopefully I figure out how to fix my tablecloth and make my flags work soon, but as of right now it has been quite annoying to work with simulations.
Main Points
We have been working with surface and parametric modeling for the past few weeks, and so far I like parametric modeling better than surface modeling. I prefer parametric modeling because I enjoy working with precise and exact parameters so that what I am modeling is proportionate. Surface modeling is better to use when making a flat image into a three dimensional object, while parametric modeling is better to use when creating an object that has specific measurements required to be accurate. This could apply to following a tutorial, in which the tutorial maker creates an object and has set specific parameters for that object, so in order to closely follow the tutorial the object you create must have those same parameters. Having the same parameters as the tutorial would make other objects created in that tutorial work with the original object, and you'd be able to change it after you're done with the tutorial by adding modifiers that make change it by variable amounts. Surface modeling is good for creating less exact objects quicker without the use of specific parameters. This allows for the creation of multiple objects in a scene without exact modifications applied to them. It is hard to do parametric modeling at home using Blender because I don't understand why changing certain parameters of my objects does not have the outcome I would expect. Sometimes changing the size or adding a modifier does the exact opposite of what I thought it would do, but it is still my preferred modeling technique. Main Points
  Twair, Motasem. Private Office Loft Style. Digital image. Https://www.behance.net. N.p., 15 Nov. 2017. Web. 29 Oct. 2018. Made in 3ds Max. Motasem Twair is a professional 3D modeler in Saudi Arabia who specializes in using 3ds Max as his main application, often using it for interior design plans. I find his use of textures and lighting inspiring, as they make the rather dull 3D model look much more realistic. His attention to detail is also inspiring, in order to make a realistic interior design he had to fully model the keys on the keyboards, the wire of the phone, and the words on the walls in the above image. I will improve my modeling skills to more closely emulate those of Twair's prior to the end of the school year by working more with textures and implementing even small details. Textures and small details are the staples of a professional 3D model that often go unnoticed unless they are not present, they can be tedious to make but are required to keep the overall integrity of an image. Therefore, I will be familiarizing myself more with textures in future portfolio checks in order to build upon my skills. I have recently downloaded Blender so that I can have a free 3D modeling software to work with at home, but I'll have to work around with it for a bit until I fully understand how to apply textures or even perform basic modeling. As for attention to smaller details, that really depends on what I would be modeling at the time, some objects simply do not have smaller details such as the ceiling lightshades in the image above. However, whenever I get an opportunity I will be sure to include them, as well as textures because I now see the difference they make by examining the model that Twair made. Main Points
Here is a link to Motasem Twair's portfolio: https://www.behance.net/motasemtwa2a56/appreciated Also, here is a 3D model I created inspired by Twair's work:  We are now well into our 3D modeling unit and we're even animating our models now. So far the process has been fun and easy, but somewhat time consuming. I learned most of the features of 3DS Max pretty quickly, so that has made the modeling process a lot easier so far. I am really enjoying animation so far mainly because it auto-generates the animations between keyframes you can set. This makes animating a lot faster than moving objects frame by frame, and let me explore other options I could do with my assignments. However, I don't like the curve editor because I don't understand it and whenever I use it my animation breaks. Besides that though I have enjoyed 3D modeling so far and i hope it continues to be fun. After doing some additional research, I found out that 3D designers can make $55,000 a year using the 3D modeling skills we learned in class. Taken into perspective though, other websites state that teachers make about $55,000 a year as well, so maybe 3D designing is not the best career to pick if you want to be rich. That doesn't mean its a bad career though, many people enjoy having this career because 3D modeling is what they love to do, regardless of the pay for it. Even better, the longer you have a job as a 3D designer the more experience you have with that career, opening up higher positions or even raises that can bring the yearly salary up to $83,000. So all in all, 3D modeling has been going smoothly so far and 3D design could be a future career choice for me if I really get into this 3D modeling.
Main Points:
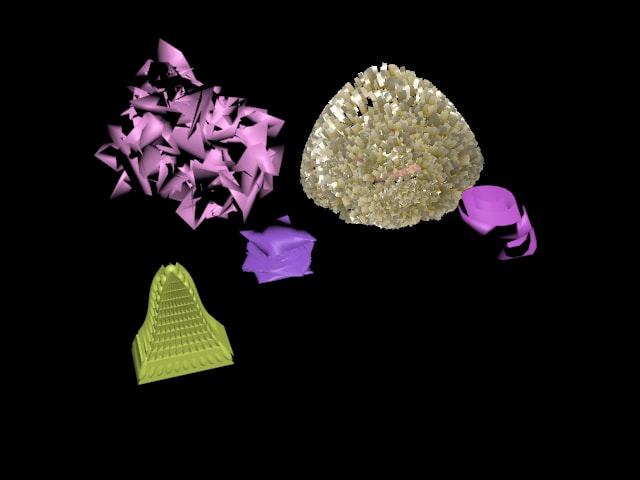
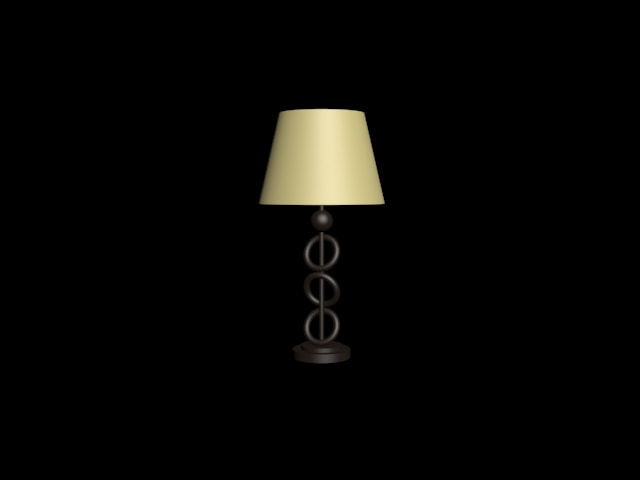
Citations: www.glassdoor.com/Salaries/3d-designer-salary-SRCH_KO0,11.htm https://www1.salary.com/NC/high-school-teacher-salary.html For this project I first explored what different modifiers do to primitives, then I modeled a table lamp using primitives and modifiers. The image on the left shows my modifier exploration, some turned out well while others crashed the computer a few times. Every model started with edit poly, from there I added modifiers such as taper, lattice, twist, and even hair. I attempted to make useful objects with each model, while also exploring what modifiers I could use to do so. The green model was my attempt at making an obelisk style building with only modifiers. I morphed the two on the right several times, turning a cone into a sphere that I turned into the afro, and turning a cylinder into a flower with skew and ripple. The abstract sharp object on the left was created from a sphere using the noise and mirror modifiers. The purple twisted box in the center was created with twist, chamfer, and mesh smooth. The table lamp was created using modifiers such as edit poly and shell. The lamp shade was created from a cone with a deleted top and bottom with a shell to add thickness. This project helped me to find out what the different modifiers of 3DS Max do while exploring with models that I could freely make.
|
AuthorMy name is Andrew Prichard and the this is my first digital arts class, I look forward to a good year with lots of hard work. Archives
May 2021
Categories
All
Last updated 5/14/21
|
 RSS Feed
